Post Details
Learn CSS
Style Sheets CSS :-
Definition: A style sheet is a set of rules that tells the web browser how to look (style) the HTML content.
-
Example: changing colors, fonts, spacing, and layout of a webpage.
-
Think of it like dressing up your website.
p {
color: red; /* Text color */
font-size: 16px; /* Text size */
}
Introduction to Style Sheets:
Understanding Styles
CSS (Cascading Style Sheets) is a language used to style your HTML webpage.
-
It makes your page look nice by controlling colors, fonts, sizes, spacing, and layout.
-
HTML is for the structure (headings, paragraphs), CSS is for the appearance (style).
How CSS Works
A style is a rule that tells the browser how to display an element.
A style rule consists of:
-
Selectors → Tell CSS which element to style (like
<p>or<h1>). - Declaration → Contains property: value pairs.
-
Properties → Tell CSS what to change (like color, font-size, background).
Syntax :
selector {
property: value;
}
-
All paragraphs
<p>will now appear blue and 16px size.
Example:
Here:
-
Selector =
p(paragraph) -
Properties =
color,font-size -
Values =
blue,16px
3. Constructing Style Rules
Style rules follow this pattern:
Types of CSS Selectors:
-
Element Selector:
p { color: green; } -
Class Selector:
.highlight { background: yellow; } -
ID Selector:
#main { font-size: 18px; } -
Group Selector:
h1, h2, h3 { color: navy; }
Example:
4. Creating Styles for Nested Tags
When HTML tags are nested, you can style them specifically using descendant selectors.
Example:
This means:
-
Apply blue text color to all
<p>tags inside a<div>.
Example HTML:
5. Applying Styles to Hyperlinks
Hyperlinks have special pseudo-classes for different states:
-
a:link→ Normal link -
a:visited→ After visited -
a:hover→ When hovered -
a:active→ When clicked
Example:
6. Creating and Linking to External Style Sheets
External CSS is placed in a separate .css file and linked to the HTML page.
Steps:
-
Create a file called
style.css:
-
Link it in HTML using:
This goes inside the <head> section of your HTML page.
**************************************************************************************
1. Formatting Text Using Style Sheets
1.1 Specifying a Font Family
You can choose which font the text should use.
Example:
-
Arial→ preferred font -
sans-serif→ fallback if Arial is not available
HTML:
1.2 Specifying a Font Size and Color
You can control how big the text appears and its color.
Example:
HTML:
1.3 Applying Bold and Italics
-
Bold →
font-weight: bold; -
Italics →
font-style: italic;
Example:
HTML:
1.4 Applying Strikethrough and Underlining
-
Strikethrough →
text-decoration: line-through; -
Underline →
text-decoration: underline;
Example:
HTML:
1.5 Creating Inline Spans
<span> is used to style part of a text inside a paragraph.
Example:
HTML:
1.6 Adjusting Spacing Between Letters
Use letter-spacing to increase or decrease space between letters.
Example:
HTML:
2. Formatting Paragraphs Using Style Sheets
2.1 Indenting Paragraphs
Use text-indent to indent the first line.
Example:
HTML:
2.2 Applying a Border to a Paragraph
You can add a border around the paragraph.
Example:
HTML:
2.3 Specifying the Horizontal Alignment of a Paragraph
Use text-align to align text.
Example:
HTML:
| Feature | CSS Property | Example |
|---|---|---|
| Font family | font-family |
font-family: Arial, sans-serif; |
| Font size | font-size |
font-size: 18px; |
| Font color | color |
color: darkblue; |
| Bold | font-weight |
font-weight: bold; |
| Italic | font-style |
font-style: italic; |
| Underline | text-decoration |
text-decoration: underline; |
| Strikethrough | text-decoration |
text-decoration: line-through; |
| Inline span | <span> + class |
<span class="highlight">text</span> |
| Letter spacing | letter-spacing |
letter-spacing: 2px; |
| Indent paragraph | text-indent |
text-indent: 30px; |
| Border | border |
border: 2px solid black; |
| Horizontal alignment | text-align |
text-align: center; |
<!DOCTYPE html5>
<html>
<head>
<title>Span Attributes Example</title>
<style>
.highlight {
color: red;
font-weight: bold;
}
</style>
</head>
<body>
<p>
This is a
<span
class=”highlight” <!– CSS class for styling –>
id=”firstWord” <!– unique identifier –>
style=”font-size:20px;” <!– inline style –>
title=”This is important” <!– tooltip on hover –>
lang=”en” <!– language attribute –>
dir=”ltr” <!– text direction –>
data-info=”123″ <!– custom data attribute –>
>
special word
</span>
in a paragraph.
</p>
</body>
</html>
Explanation of Output
-
Text Displayed:
-
“special word” will appear red, bold, and 20px (due to
class+style). -
The rest of the paragraph stays normal.
-
-
Tooltip:
-
Hover over “special word” → you’ll see “This is important”.
-
-
Attributes used in code (id, lang, dir, data-info) don’t visibly change text but can be used for:
-
JavaScript (
id,data-info) -
Accessibility or browser processing (
lang,dir)
-
Key Point: Closing <span> Before <br>
<span>applies styles only to the text inside it.- Once you close the
<span>tag, the styling ends. <br>just adds a line break, but the style doesn’t continue beyond the closed<span>.
Example:
<p>This is <span style="color:red;">red text</span><br>And this is normal text.</p>
Explanation:
<span style="color:red;">red text</span>→ “red text” appears in red.</span>closes the span → styling ends.<br>moves the next text to a new line.- “And this is normal text.” → appears normal, because it is outside the span.
Important Takeaways
- The line break (
<br>) does not reset styles; it’s the closing of the<span>that ends the red styling. - If you included
<br>inside the<span>, the break text would still inherit the span styles:
<p><span style="color:red;">red text<br>still red</span><br>now normal</p>
- Result:
- “red text” → red
- “still red” → red (inside span)
- “now normal” → normal (outside span)
Three Ways to Apply CSS
-
Inline CSS: Style applied directly in the HTML tag.
-
Internal CSS: Style written in the
<style>tag inside the HTML file.
-
External CSS: Style written in a separate file (like styles.css) and linked to the HTML.
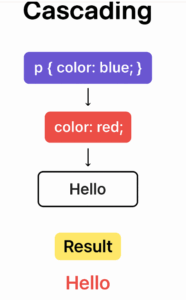
What “Cascading” Means
-
In CSS, you can apply styles in different ways (inline, internal, external).
-
If more than one style affects the same element, the browser has to decide which style to use.
-
This decision is called cascading.
<!DOCTYPE html>
<html>
<head>
<title>Cascading Example</title>
<style>
p {
color: blue; /* Internal CSS */
}
</style>
</head>
<body>
<p style=”color: red;”>Hello World!</p> <!– Inline CSS –>
</body>
</html>
-
The
<p>tag has two styles applied:-
Internal CSS:
color: blue; -
Inline CSS:
color: red;
-
-
Which color will the text be? → Red, because inline CSS is more specific than internal CSS.
-
The browser “cascades” the rules and chooses the most specific one.
Cascading = Browser decides which style to apply when multiple styles exist, based on specificity and order.
How the browser decides:
The browser uses CSS specificity and source order to decide which style to apply. The general rules:
-
Inline styles have the highest priority.
-
They override internal and external styles.
-
In your example:
style="color: red;"wins overp { color: blue; }.
-
-
Internal styles come next.
-
They override external styles but not inline styles.
-
-
External styles have the lowest priority unless
!importantis used. -
If multiple rules have the same specificity, the later one in the CSS wins.
In your example:
-
Inline CSS:
color: red -
Internal CSS:
color: blue
Since inline CSS has higher specificity, the paragraph text will appear red, not blue.